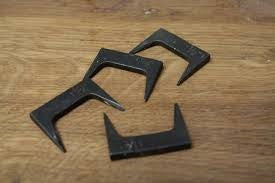
Pinch Dogs, the old school way to glue up boards...
Mar 23 2017 0 Comments
Today I visited a woodworker friend and "tool nut" like me, and while I was admiring his tools I found hidden in a dark corner of his bench two pinch dogs, sometimes also called pinch nails or timber nails. This is only the second time in my life I've seen one of these, and he told me they belonged to his grand father and he didn’t know what they were. So I explained to him what they're for and then we had a play with them.

Later on, I found a very good post from Paul Sellers about how to make your own Pinch Dogs. But first please watch the video below showing the different types you can get and how to use them.
Click on the picture to watch the video
Below is an excerpt of Paul Sellers post on how to make your own Pinch Dogs.
"Mostly they were blacksmith made, but now the trade is not generally available to us, so we make our own from flat bar stock as I show here.
The best use of the dogs is to glue up boards and use them to apply pressure from both ends of the boards. This transfers pressure along the glue line. Generally, though not always, we make an allowance to compensate for the material we lose in leaving holes in the end grain. That’s when the end grain will be visible after construction is completed. The picture below shows what I mean.

If you are concerned about end grain shrinkage on the outer edges along the edge grain then I wouldn’t unless you are using green wood or wood that has higher moisture content than you should be using. If the wood shrinks at the ends faster than the mid section can release its moisture it can cause an issue, but as said, this is usually the result of inadequate drying or seasoning in the first place. When moisture levels are around say 8-12% there should be no issue. Conversely, if moisture intake at the ends is heightened because of location, kitchen or bathroom, a hollow along the joint line can certainly cause issues, as the mid section can’t absorb moisture as fast as the ends. Whichever way you go, remember to advise your customer or the recipient of the piece not to leave the piece near to a heat source, which can also mean a window in full sun, heating radiators and fire stoves and hot air blowers for central heating.
Let's make the dogs...
To make the dogs I used some O1 steel, but mild steel will work fine. In my case I made the dogs from 3mm x 25mm x 62mm (1/8” x 1” x 2 1/2”) long rolled bar stock.

I laid out my cut lines on the bar before cutting to length. That way I have the extra length for holding on to for the bulk of the work. The scriber in the end of the stock of the combination square works well, but you can use any sharp steel point. I also used a marking gauge for the long depth line, to keep me parallel.

The drawing above gives recommended cut lines. Notice that they don’t come to a point as yet. I draw out the tips between two hammerheads but make sure you take safety precautions such as safety glasses.


I drew out the steel points from both outside faces and the inside edge of the pins. They don’t really need to be sharp. That’s up to you.
I hope you enjoyed reading that and maybe learnt something.
Cheers, Gaston
0 comments


Leave a Comment